#Chocolate Molten Lava Heaven with @NomuChirps #Baking Kit

A chocoholics dream come true. The Nomu Chocolate Fondant baking kit is so simple to use with stupendously tasty results. Nothing tastes better than freshly baked goods at home and with the convenient easy bake kits that Nomu offers, anyone can succeed at baking brilliance.

f9f1c6d1-90d2-4713-be26-b95358e5890b_jpeg(1)

I am a keen baker with an addiction to chocolate. I took part in the awesome Delish Box this month and was gifted a Nomu Chocolate Fondant baking kit from my paired partner Suhaifa. I was ecstatic and decided to try the Nomu baking kit for the first time  last night as a weekender cherry on top. I usually prefer baking from scratch but to be honest I have yet to find a super easy fondant recipe that can be made in small quantities.

The Nomu baking kit promises foolproof baking using only the finest pastry ingredients. I put it to the test. The baking kit box clearly outlines what you need in addition with the baking kit. For the Chocolate Fondant kit, the shopping list was short and no special ingredients or tools needed to be purchased as I already had all the ingredients at home and the kit comes with 4 convenient baking cups which means no washing up or worrying about finding ramekins to bake with.

shopping list

Shopping List 

Method 

Making this superb dessert took more time to edit  photos and tweet about than actually doing the prep and baking. Another one for the #15minute food category. It really is so simple. Whisk the eggs, melt the butter and you are ready to go.

melted butter and whisked eggs

Preheat the oven and apply a non-stick spray to your fondant cups.

Place the sachet ingredients in a bowl, add the lightly whisked eggs, melted butter and milk to the mixture and whisk lightly to mix.

Pour mixture into the four cups equally and bake for 9-11 minutes depending on the heat of your oven. Mine took 9.5 minutes as I have a fan assisted oven. The finished product is supposed to be slightly hard on top and gooey in the center.

how to

Serve immediately. Place them upside down on a plate and serve with cream or ice cream. Voila, an amazing yummy chocolate adventure for your taste buds. Heaven in a box! Seriously though, I have tried a few baking kits and this is at the top of my list. I cant wait to try my Vanilla cake kit and Oatmeal cookie baking kit that I received as a prize from the #Joziliciousmixer hosted by Hasmita earlier this year.

Fotor0224123422

Till Next Time

Happy Baking

Xoxo

A makeup artists 7 minute makeup routine

I work in the corporate world and like so many others, I have limited time during my morning routine. My 7 minute makeup routine is all I need in the mornings to prepare for work. Being a qualified makeup artist has taught me a few tricks of the trade for a quick beauty regime.  I have spent time choosing the right products and the correct colour pallet before hand and of course, using the correct application tools which allows me to do my 7 minute routine with ease.

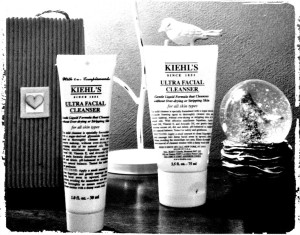
1. Skin Care – I cannot stress enough that the basis of any beauty regime is good skin care. More than half the battle is won if you are looking after your skin. That’s why I always (and I mean always) take my makeup off the night before. In the shower, I wash my face with my Kiehls Ultra Cleanser to remove any residue makeup and its gentle enough on the skin that it doesn’t dry it out. A quick spritz of toner and a good day cream with an spf. I also always add a Spf 50 on top of my cream. Prevention is better than cure. If your skin is looking a bit dull, I highly recommend using the Dermalogica Daily resurfacer that gives immediate results after cleansing and before toning.

fotor_

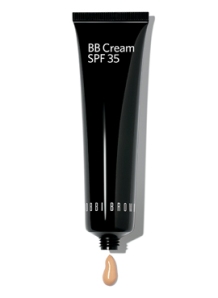
2. BB Cream – An essential product for a quick beauty routine is having products that double up. A good BB cream (Beauty Balm) with built in SPF gives my skin a quick plump up and smooth surface and acts as a primer. If I am feeling like a bit of extra coverage, I add a layer of my Givenchy Fluid Foundation. I apply the bb cream with my fingers and then blend with a blending sponge.

product_shot_1(1) E6Y8_l

3. Eyes – I sweep dark brown eyeliner on the tops of my lids, keeping my eyes closed. This is a quick way to add liner in one move  to both the top and bottom lines. I also use the eyeliner to gently fill in my brows. I recommend using a colour palette that enhances your eye colour. The Almay and Revlon Palettes work well. Alway try and use full size eyeshadow brushes. A good option is the Avon Eyeshadow brush that has a eye smudging tool attached. Use 3 – 4 colours max, a light overall colour, a semi dark colour over the bottom half of the lid and a darker colour in the crease of the eye. You can also opt for a highlighter on the brow bone. I finish off my eyes with Bio Nike Brown Mascara available at Dischem for work days as it doesn’t clump or smudge and lasts all day. It also separates my lashes and colours my lashes with little application.

4. Cheeks –   a cream blusher is easy to apply with the fingers and I add a smidge of blush powder over the cheeks, on the cheek bones. Again, using a full size angled blush brush makes a difference. Applying colour to the lips and cheeks is the easiest way to liven your look.

Feature_BvB2

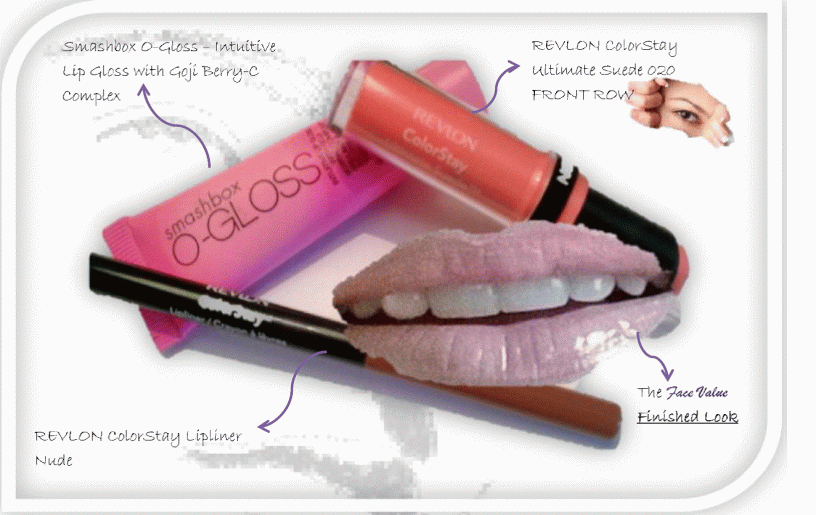
5. Lips – It has taken me many trials to get the perfect work lip colour right. I have finally found a colour that goes with every outfit I wear and is naturally nude. Take your time in finding the right colour for your complexion.

Revlon and SmashBox Finished Look

6. Setting – You can either set your makeup with a translucent powder or a setting mist. I opt to only use the setting powder on my t- panel and my chin so that I keep the dewy look from the bb cream on my cheeks. I also use a setting mist from Ulta which helps the makeup remain throughout the day and gives me added protective layer of moisture.

Till Next time

Xoxo

#15MinuteDinner – Dijon Chicken Schnitzel with Leafy Greens and Tomatoe Salad (Carbs Free)

A new category of 15 minute recipes for those of us who don’t have a huge amount of time but hungry mouths to feed. This quick and simple Dijon Chicken Schnitzel recipe is super simple to make and very yummy and yes, it literally takes 15 minutes to prepare.

I dont always have time for huge dinners and this year, Cameron and I are trying to eat less takeaways for health and budget reasons which has resulted in me getting to do one of my favorite things, read recipe books. I always feel inspired and love creating my own versions of the recipes.

Ingredients (Serves 2) You can double the quantities as needed

  • Two chicken fillets (defrosted) and cut in half
  • Salt, Black Pepper
  • Dijon Mustard
  • Flour
  • 1 Egg (Whisked)
  • 125 ml Cream
  • Kale or Spinach (Washed and Chopped up roughly)
  • Baby Tomatoes
  • 1 tsp Garlic
  • Cooking Oil and Butter (Click here for a healthy, budget friendly butter)
  • Can of baked beans or creamed corn

Method 

  1. Take your two chicken fillets and slice with a sharp knife to make 4 fillets, cover them with plastic wrap and flatten with a rolling pin
  2. Season the fillets on both sides with salt and black pepper
  3. Smear a dash of Dijon Mustard on both sides
  4. Sprinkle with flour and set aside the fillets on a plate
  5. In a separate bowl, whisk the egg until light and fluffy and pour into a flat dish
  6. Heat up a large cooking pan with a tsp cooking oil and tbs of butter
  7. Dip the fillets in the egg and place in the pan – cook until golden brown
  8. In a separate pan, add the kale or spinach with the garlic and on medium heat, let the leaves wilt
  9. Add some salt, pepper and olive oil on the baby tomatoes and grill for 5 minutes in the oven
  10. In the pan that you fried the chicken, add the cream and a tsp of dijon mustard, let is reduce and use as a sauce
  11. Serve the tomatoes on the bed of kale with the chicken fillets accompanied with baked beans  and mustard sauce.

Voila, another delicious healthy meal in just 15 Minutes.

Till next time

xoxo


Scrumptious Fresh Green Bean and Bacon Salad

Image

@Fresh_Living challenged me to make this amazingly scrumptious Green Bean and Bacon Salad for my husband yesterday via twitter. I was delighted to come across a salad recipe that my husband could get on board with. Just another reason why I love the twitter-verse, it has opened up my world in so many ways.

If you are anything like me, with a full time job and a home to run, looking for ingredients that are not readily available puts me off a recipe so I was delighted to see that I had the majority of the ingredients already. I asked the hubby to pick up some Halloumi on the way home and accepted the challenge gladly.

One of my 2014 goals that I have set is to spend more time with family and I have challenged myself to try and have at least one family meal a week, alternating between my husbands side of the family and my side of the family. The idea is to have them over for a quick, 1.5 hour meal that’s simple to make and easy to clean up. This was the perfect kind of recipe for just the occasion.

How did it go?

I was very impressed at how easily I was able to print the recipe and took out the bacon to defrost. It gave me the perfect excuse to use our new microwave and to christen our new orchid colour frying pan. Admittedly I had to look up what “blanch” meant to make sure I did it correctly and threw the green beans into a pot of water while I made the delicious simple to make home made sald dressing. I don’t enjoy Capers so I substituted the capers for soya sauce which was super yummy.

Image

Image

I have never cooked Halloumi cheese before but it is surprisely simple, I just had to slice a few thick pieces, sprinkle with flour and fry in the bacon fat. OMG! So delicious that I was given strict instructions to make a double batch of Halloumi next time.

Image

I decided to add some mixed salad leaves to give the meal a more summer fresh look with some lightly dry fried red, green and yellow peppers. I like a recipe that I can add a little bit of my own flare to.

My husband and I are huge fans of the new Jamie Oliver 15 minute meals and the style in which he serves meals on large boards so out came the large serving board and the meal was ready. I did add jacket potatoes to the menu to add some sustenance.

Image

The family really enjoyed the meal, including my 12 year old sister who was begging for more halloumi. This will now be filed into my recipe book online as well as in the family favourites file. Very simple to make, quick to clean up and 9/10 for deliciousness. Thanks to @fresh_living for the challenge. Tonight I will be attempting the spicy chicken wrap. Next time you are not sure what to make for the family, pop over to the Pick N Pay site online and you will find some awesome simple recipes to inspire you, you can even look for recipes via ingredients. Happy cooking.